Thursday, December 17, 2009

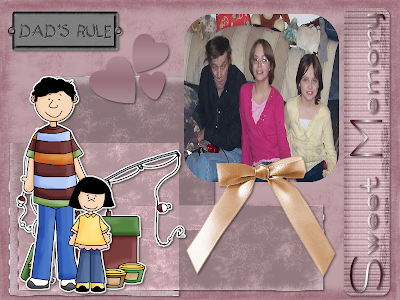
A Father's Love


For this tutorial You will need the following:
Template by Rainy at Rainy's Templates.
She has many other templates to choose from
that could be used for this tutorial.
Scrap Kit I used or one of Your choice. It really
should be full sized though. The kit I chose is
by the awesome Sharon of As Sweet as Honey
I used the kit called It's a Dad Thing from Scraps
With Attitude. Thank You Sharon hon for letting
Me write a tutorial with Your kits -hugs and kisses-.
Images or tubes of choice. Images would be best for
this sort of tutorial but it's up to You.

The reason I wrote this tutorial is that I don't see
many around if at all and thought I'd teach those
of You that would like to use Your wonderful digital
images that You take and can't use can display them
easily in a pretty Quick Page. I hope some of You
find this of use. So let's get started

Open Your images and template in psp and minimize the
images. When opening the template Your going to lag
just a bit as it is a big file. Shift +D and close the Original.
Go to Image Free rotate and choose left at 90 degrees and
all layers checked.

In Your layer palette click on the background layer and
from the kit open a paper and go to edit copy. Selections
Select all float . Selections defloat and then on the template
edit copy paste as a new layer. Selections select none.

Back on the template choose the gradient layer and
do the same steps as above with either the same paper
or another of Your choice.

On the photo layer if Your using an image go to selections
select all selections float selections defloat and paste it
as a new layer. If Your using a tube just do as We had
done above and then add Your tube as a new layer.
Selections select none.

Delete the layer that's up above this layer. On the word
background do as We did above using a paper of choice.
Then on the hearts layer go to Image Free Rotate and
choose right at 90 degree's all layers unchecked this
time.

With Your eye dropper tool use a light and dark color
for Your foreground and background. Now on the
template with the hearts layer go to selections select
all, selections float, selections defloat, layers new raster
layer. Go to Your material palette and choose a gradient
of Your choice from the two colors You chose. Flood fill
the new layer with the color and go to selections, select
none. Effects, Texture Effects, Blinds and use the following
settings or one's of Your choice width 2, opacity 15, color
black and both boxes checked.

On the text layer You can do this a few ways. You can colorize
it, use Your manual color correction or do it with the gradient
as We did above. So it's all up to You on this one. I chose the
manual color correction. When done go to the original grey
scaled hearts and delete the layer.

Now add any elements You want from the kit. You may
have to resize a bit so if you do go to image resize and make
sure all layers is unchecked and Your sizes should be in percent
not pixel. Give all Your layers a drop shadow of choice and any
other text You wish to add if You choose and save as png and
Your done. There is Your Quick Page.




Monday, December 14, 2009

Luv My Sista


I have made a tag for Ann at Addicted 2 Scraps with Her
kit called Luv My Sista. Just click on the title and You can
purchase it for Yourself.

This kit in My honest opinion is worth the buy. It comes
with a ton of elements and a lot of papers to play with.

I also made a freebie for You all without the garv tube so
that You could add whatever You wished to it. You can
find it here.

Thursday, December 3, 2009

Misfits Christmas Train


Hiya guys. I finally did a scrap kit challenge and
You all are welcome to download it. Misfits did a
train for Christmas and I thought I'd share
here on both of My blogs. You can download
it at the Misfits blog.

This kit is much better when peeking
inside and not just the preview. I am
still trying to learn how to do all the
previews and make em pretty LMAO


Tuesday, November 3, 2009

Sad News

I have some sad news for You all today. My friend's dad
passed away after a long fight with cancer yesterday afternoon
after having a seizure Friday night. He had just gone into remission
and contracted an infection and He slowly grew worst. Alot of You
know this friend. Her name is Lisa but goes by the name of
Aleah'sMommy. I am asking that if You can afford to help
out with a donation that it be sent to her email. I know the
medical bills for his cancer were astronomical and as We all
know the costs for funerals and arrangements will only triple
that bereavement upon this poor family. Her uncle is also
fighting cancer but isn't expected to make it much longer and
this is Her Dad's Brother so she's had one very very hard year.
You may send Your donations to hottlildevil110584@yahoo.com.


I think You from the bottom of My heart if You can help during
Lisa's time of need. This was an unexpected occurence by all
of Us as He was getting much better and healthier.

xoxoxoxox
Jynxi

Friday, October 30, 2009

New Stuff on My Scrapping blog

I have a set of stockings and new Christmas cookies
I made on My scrapping blog. Please do take
a look and be sure if You download to let Me know
and leave a bit of love.

xoxoxoxo
Jynxi

Tuesday, October 27, 2009

Hello Everybody

As many of You know I had thought to dabble in
the scrapping world a bit more other than to just
write tutorials.

Well I have begun and have started another blog.
This doesn't mean I won't be writing tutorials
anymore it just means I will be adding more to
what I normally do for You all. I hope You all understand
and might even visit and snag up some freebie's I have
posted and show Me what You make with them. Anyhow
You can find Me at My Hide Away. I hope to hear from
You all over there.

xoxoxoxoxoxo
Jynxi

Friday, October 2, 2009

Autumn Splendor


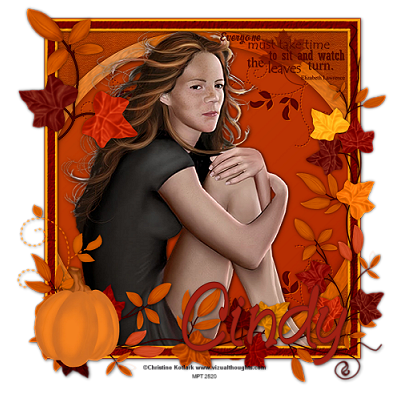
You will need the following supplies for this tutorial.
Scrap Kit by Cindy.
It's called Autumn Splendor.
Thank You Cindy for allowing Me to use Your
kits in My tutorials -hugs and kisses-.
If You can't get this kit any will do.
Tube of choice. I am using a tube by the
wonderful artist Christine Kotlark.
You can find Her tubes at MPT.
Please don't use any of Her work without
the proper license.
Font of choice.

Open an new image 800x800. I know it's big but You can
crop or resize it later. Make sure it's transparent.
From the kit find a frame You like. Open it and go to
edit copy and edit paste as a new layer on Your
transparent image. If Your using the same kit
You'll have to resize the frame by 85 percent so to
to image resize all layers unchecked and resize it by
85 percent.

With Your magic tool click inside the frame. If Your using
the kit I am You'll have to hold down the shift key
while selecting all the area's around the pumpkin and leaves.
Selections modify expand by 10 or so. Now go to edit paste
as a new layer. Selections invert
and tap on the delete key on Your keyboard.


Selections select none. Pull this paper layer below Your
frame layer. You might have a missing piece in the frame so
use Your magic wand and click it or use Your shift key to
select multiple one's and go to selections modify expand by 10
or so again and do the delete step again.


Now make sure the layer that You just did if You had a
missing piece go to layers merge down be sure either
one of the paper layers is chosen when You do the merge.

Go to Your tube. Copy and paste it as a new layer. On My tube
I had to resize it by 160 percent to go with the size of the
frame. Slide the tube under the frame layer and with
Your eraser tool erase any of the overlap.

Effects 3D Effects Drop Shadow vertical and horizontal 2
opacity 55 blur 10.00 and the color black.
Repeat this drop shadow with the horizontal and the vertical
set to 0.

Now We'll begin to add any of the elements from the kit
that We like. I used a journal box that came inside
the kit and resized it a bit then erased the overlap once again
as We did our main tube. Give it the same drop shadow
with the 0 settings.

I added a word art and some leaves that came with the kit
and gave it the same drop shadows as above. I also
added Cindy's name to the tag. I used Fountain Pen and
as always created it as a vector and then converted it to a raster
layer and added a drop shadow to it. I also then added that
same drop shadow to My frame.

I added the artist's copyright and My license number and then
resized My tag to 500x500 pixels all layers checked and
merged visible. Save as png and Your all done.