Showing posts with label Breast Cancer Awareness. Show all posts

Thursday, December 31, 2009

Wings Of Hope


You need the following supplies for this
tutorial.
Paint Shop Pro.
I have psp 10 but any version should
work for this.
Scrap Kit of choice or Mine.
Mine is by the talented designer Charly of
The kit is called Breast Cancer Charity
Kit.
You can find it at her store here.
Template By Jolanda from Jellebelleke's


Open template in psp.
Image resize
all layers checked
700 pixels. Make sure that
it's not percent.

With Your magic wand click on Raster
1.
Layers
New raster layer.
Find a paper You like from the scrap kit
that You chose to use and
open it in psp.
Edit Copy.

With Your magic wand click on Raster 1.
Layers
New raster layer.
Edit
Paste into selection.
Selections
select none.

Click on Raster 5 and using Your magic
wand use it on the layer.
Layers
New raster layer.
Open another paper of choice that
will blend in well with Your
creation.
Edit Copy
Edit Paste as a new layer.
Selections
Select None.

On Raster 6 repeat the same steps
as above.
Do the same for Raster 7 and then on
the copy You'll have to scroll up
slightly in Your layer palette and do the
same as We just did.
If You have a nicely textured paper then
use another with a lighter shade.

Ok go back down to Raster 4 and using
Your Manual color correction tool
use these settings:
Manual color target
checked.
Freehand Selection
unchecked.
Source: use the eye dropper tool and
use the same color as the
frame.
Target a color that goes well with
the rest of Your QP.

Now delete all the templates original
layers except leave Raster 3
alone. We'll get to that here in just a
little bit.

Now just start to add any of the elements
from Your chosen tag that You
like.
If they are too big to
Image resize
All layers unchecked.
Be sure that percent is now chosen
and just reduce it's size until
it's right. If not just hit undo and keep
trying.

Let's add a little depth to all of Your elements.
Effects
3D Effects
Drop Shadow
and use your own settings as no matter what
I tell You to use it always varies on
things such as this.

Remember that blank black layer? With Your
magic wand click on
it.
Leaving the ants marching hit Your delete
key.
Keep the ants marching.

Click on raster layer 12 and hit Your
delete key once again.
If Your like Me and always put drop
shadows on it's own layer You
will need to delete
those too.

Click on Raster 10 and 12 repeating
these steps.
See how easy this was? You've now learned
a new trick.

Ok now We are going to add some text to
this very pretty page You've
been making.

Click on Your eye dropper tool and depending
on the paper You used
on the background You will either choose a
light or dark color.

Now add any of the text You want and give
it a pretty drop shadow.
If You wish to now add an image of Your own
just click inside the frame and go to
selections
modify
contract
by only a few pixels though and then it should
look very very nice.

I hope You enjoy this tutorial as much as I did
writing it for You.


Thursday, September 24, 2009

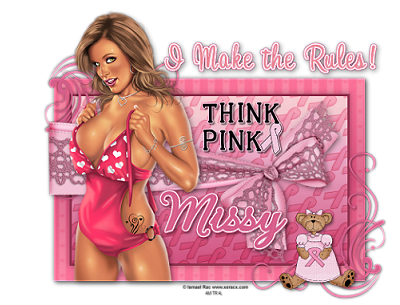
I Make The Rules


You will need the following things for this tutorial.
Template 19 by MelissaV. You can find it on the
Just search under templates.
Scrap Kit of choice or the one I'm using by Missy.
It's called Breast Cancer Awareness.
This kit is available in both tagger and full sizes.
Tube of choice. I am using the awesome work of Ismael
Rac. You can find His tubes on AMI.
Eye Candy 4000 Gradient Glow (optional text only).

This tag is made with two very special ladies that I have loved
dearly all My life. My Grandmother was diagnosed with
breast cancer before I was born and beat it. The odds back then
were very low compared to now. My Mother also was diagnosed with
breast cancer and had a masectomy. I almost lost Her not due to the cancer
itself but to infection afterwards. I have almost lost Her twice in My life
and I am just grateful to God and those that prayed for Her
recovery and Her inner stubborness because without that I don't think
She would have made out after the infection as well as She did.
I love You Mom.
For those of You that are still young please, please always do Your
examinations and get those Mammogram's. They are so important
and can detect the cancer in it's earliest stages.

Open the tube and template in psp and minimize the tube. Shift +D on
the template and close the original copy. Delete the copyright and
white background layers.

Image canvas size 600x600. With Your eye dropper tool
choose a light and dark color from Your tube.
With Your magic wand click on the
Back Rectangle layer. Layers new raster layer and flood fill
with a gradient of choice. I used the settings of angle 0 repeats 1
invert checked style linear.

Keep the ants marching and find a paper You like and go to
edit copy edit paste as a new layer. Selections Invert and then tap
the delete key on Your keyboard. Selections select none.
Place this layers blend mode to soft light.
Delete the original layer.

On the gradient filled layer go to Effects 3D Effects Drop shadow.
Vertical and Horizontal on 2 Opacity 50 blur 8.00 and color
black. Repeat this step but put the Vertical and Horizontal to 0.

Use Your magic wand on the Front Rectangle layer.
Repeat the steps from above with the gradient
and paper. This time I changed the colors of My gradient
with the settings Angle and Repeats 0 Invert unchecked
and style linear.
Put the paper's layer on overly and the Opacity about 60.

On the solid line of that same layer click on it with Your magic
wand. Layer's new raster layer and flood fill it with
Your darker color. Give this filled frame layer a Drop Shadow
of Vertical and Horizontal 0 Opacity 50 Blur 10.00 Color
black. Delete the original layer.

On the corner layer go to Selections Select All Selections
Float Selections Defloat. Layers New Raster Layer and fill this
layer with a color of choice. Effects 3D Effects Drop Shadow
Vertical and Horizontal 0 Opacity 45 Blur 4.00 Color
black. Delete the original layer.

On the corner duplicate it and then go to Image Free Rotate
bye 180.00 degree's right. Move this however You
it looks good to You.

On the text layer go to Selections Select All Selections
Float Selections Defloat. Layers New Raster layer
and flood fill this with a color of choice. Selections Select
none. Delete the original layer. Effects Eye Candy 4000
Gradient Glow. Under the Basic tab only change the Glow Width
to 2.00 the rest default. On the Color Tab use the thin setting and use one
of the colors in Your tag.

On Your tube go to Edit Copy Edit Paste as New Layer. I had
to resize Mine by 70 percent. So if You need to do this
go to image resize by 70 percent (play with the numbers) all layers
unchecked and hit ok.
Give Your tube the same drop shadow as We just used above.

Now just add any of the elements from the kit You like giving them
the same drop shadows as before. Delete the crown as I
didn't think it looked right on My tag but this again is up to You .
Add Your text. I used the same Gradient Glow and Drop Shadow
as before. Put on the copyright and save as png and Your all done.